| Restoring a Model T Rear Spring - By Tony Cimorelli | |||
|
Step1 - Compressing Spring with C clamps Step2 - Replacing center bolt with threaded stock Step4 - Closeup of raised script Step7 - Leave before restoration Step8 - After painting and lubricating Step9 - Inserting threaded rod Step11 - Placing C clamps on spring Step12 - Inserting new center bolt Step13 - Final product - top view Step14 - Final product - side view
|
The spring in my 1923 Touring was really beat
looking, pitted, and covered with ugly bright red paint. I needed to
restore it.
First, I used paint stripper (Pro Stripper from Lowe's) and coated the spring, scrapped and wire-brushed it off. Then hosed it off. Now the real work begins. After consulting with the MTFCI forum, Reid Welch gave me the most excellent advice of using a threaded rod and C-clamps to disassemble and reassemble the spring. Step 1 - Disassemble the spring. I put a pair of C-clamps on either side of the center spring bolt (Figure 1).
Step 2 - Replace the center bolt with a piece of 3/8 inch threaded stock. Put a nut on either side of the spring.
Step 3 - Undo the C clamps and unscrew the nuts to expand and separate the leave springs.
Step 4 - Here is a closeup of the stamped and raised Ford script on the top leave.
Step 5 - Now we scrape the crap and goo of the leaves. One at a time and is time consuming
Step 6 - Now we sand the leaves and try and remove as much rust as possible.
Step 7 - Here is the bottom leave before restoration.
Step 8 - After painting, the leaves are laid out and lubri-plated between the leaves to prevent any future rust and deterioration.
Step 9 - Inserting a threaded rod between the finished leaves.
Step 10 - After inserting the threaded rod, put a nut on either side of the spring. Tighten the threaded rod until the C clamps can be placed on.
Step 11 - Place the C clamps on either side of the threaded rod. Compress the spring until the C clamps slide over and then tighten the C clamps which will compress the spring, allowing insertion of the center bolt.
Step 12 - After spring is compressed, insert the center bolt and tighten. Then remove C clamps.
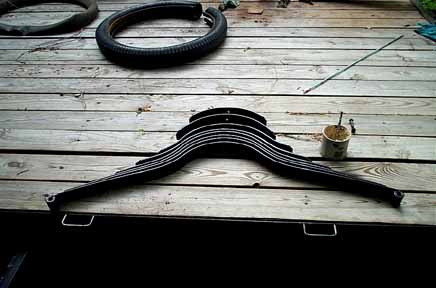
Step 13 - Final assembled spring, view from the top. Notice the raised and stamped Ford script on the top leave and also a stamped Ford-X on the right-side next to bottom leave.
Step 14 - Final product - side view. Plan an afternoon to completely restore a spring if you have no power tools, and need to do by hand.
|
||